


Wiring A Factory ECU Into Your LS-Swapped Muscle Car Can Truly Be Painless
There are hundreds of magazine stories that mention about how easy it is to swap an LS engine into an early Chevelle, Camaro, or other GM vehicle of your choice. But that doesn’t mean this conversion just falls into place. The mechanical part has been covered in detail, but there are literally dozens of other… The post Wiring A Factory ECU Into Your LS-Swapped Muscle Car Can Truly Be Painless appeared first on The Online Automotive Marketplace.
There are hundreds of magazine stories that mention about how easy it is to swap an LS engine into an early Chevelle, Camaro, or other GM vehicle of your choice. But that doesn’t mean this conversion just falls into place. The mechanical part has been covered in detail, but there are literally dozens of other decisions necessary along the way. We’re going to take just one portion of that swap and dive into the details of adapting factory ECU control for a generic Gen III LS engine and trans into a Chevelle.
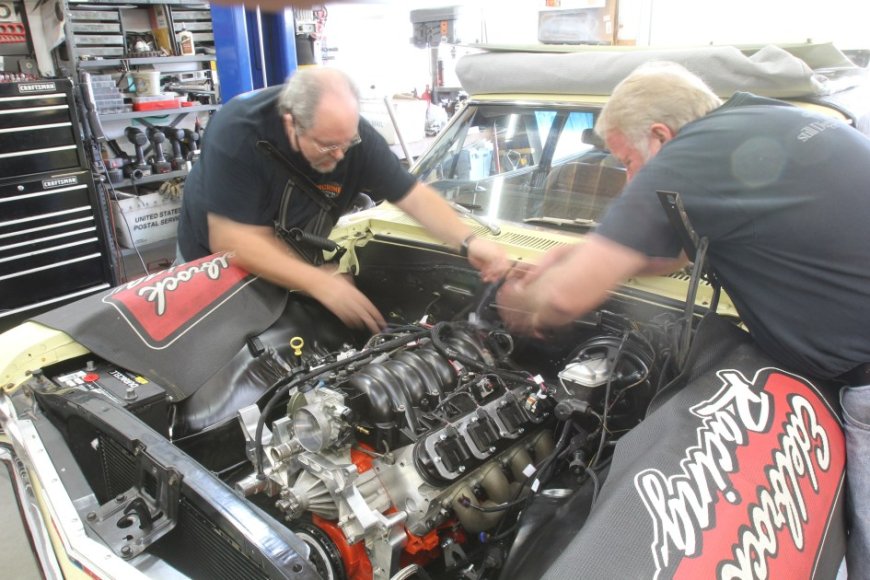
The LS-Swapped Chevelle That Will Receive The Painless Upgrade

In our particular case, we started with Eric Rosendahl’s really nice ’67 300. The author upgraded a 2001 Gen III 5.3L truck iron block engine with bigger pistons to punch it out to 5.7 liters of displacement and complemented the build with a conservative Comp hydraulic roller cam and an LS2 Camaro mechanical throttle body intake. The Chevelle had been previously powered by a stout 383-cu.in. small-block with a Tremec five-speed, but Eric preferred a more docile 4L60E automatic trans.
Once the cable throttle pedal and shifter conversions were completed, it came time to locate an ECU and the appropriate wiring harness. Painless Performance offers several factory “411” ECUs in which the company has removed the GM PassKey anti-theft applications to make the ECU functional, along with a complete wiring harness.

The Painless ECU we selected was loaded with a stock 5.7L LS1 Camaro tune, along with all the controls for a 4L60E automatic transmission. We then chose the appropriate engine harness with extra-length wiring that we figured could be useful for locating the ECU somewhere within the interior.
The next step was to lay out the harness and ECU to determine a suitable location. This also demanded that we position the harness to allow easy access to the bank of eight fuses and two relays that control power to the various systems. The Chevelle had bucket seats without a console, but Eric determined he could mount the ECU under the front passenger seat and position the fuse box inside a center console, while still offering plenty of room to route the wires under the hood. Best of all, the entire system was hidden from view.

We won’t go into every detail due to space considerations, but there are a few items that are worth mentioning. At all times we read and followed the detailed Painless instruction sheet. For the most part, the harness is supplied with the connectors in place. However, in situations where wires needed to be extended or custom-terminated, we used simple non-insulated crimp connectors followed with shrink wrap insulation. This process takes slightly longer to complete, but is more professional and certainly looks better. Under no circumstances should you use those cheesy blue Scotch Lock crimp connectors for any electrical connection on any car – period.
Routing The Painless Wiring And Other Ancillary Tasks

Once the ECU was located, Eric picked up a reproduction center console and cut a hole in the center storage area to fit the fuse block and relays. The rest of the harness was then routed underneath the console and we cut a 1 5/8-inch hole in the firewall, centering the hole so that it would be low enough to be unobtrusive with the engine in the car. We insulated the new harness port on the firewall with a Seals-It two-piece seal.
All of the connections for the Painless harness are clearly marked, so making the connections was rather straightforward. That included plumbing the air inlet and the mass airflow sensor. Controlling the alternator can sometimes be confusing, but a simple four-wire connector on the alternator with the “L” terminal directed to the charge indicator lamp in the dash will solve the problem. If the idiot light is not used, Painless offers a connector with the proper resistor wired in to accommodate this connection. This connection is used as a voltage sensing wire for the internal voltage regulator.

This Painless ECU harness can also accommodate all the emission control devices such as the EGR, vapor canister purge, air pump operation, and others. These are all positioned in a separate wiring loop that we coiled out of sight and not used as our application did not require these components.
Eric did want a separate aftermarket tach and the Painless harness includes a white wire for the tach. However, this white wire is intended for use only with a late model factory rev counter and not for use with the more common aftermarket tachometers. There is a budget work-around using a resistor for the power-up circuit but Eric decided instead to employ a simple Dakota Digital electronic box that converts the factory ECU signal to one compatible with an aftermarket tachometer.

This Dakota conversion box could also be employed to drive an electronic speedometer like the slick speedo unit sold by Dakota Digital. This way the conversion box takes output speed signal from the vehicle speed sensor (VSS) which can then be easily manipulated to send an accurate speed signal to the electronic speedometer. This eliminates that annoying speedometer needle wobble that is so common with older cable-driven speedometers from the ‘60s.
The Painless harness also came configured with outputs to control a pair of aftermarket electric fans. The harness connections are present as ground-triggers to be signaled by the ECU. This required a pair of 40-amp relays that were purchased separately. Eric found a handy relay box with six 40-amp relays that allowed him to not only trigger the electric fans, but to also increase the voltage to his headlights to make them significantly brighter.


Testing The New Painless Wiring And Factory ECU
Once the Painless harness was completely connected, Eric and crew test fired the engine for the first time to see if the package would actually work as advertised. Painless describes in the instruction that the first attempt at starting and idle demands that the engine will need to achieve a coolant temp of at least 176 degrees F and then idle in gear (with an automatic) for five minutes.
We discovered that we had to run through this several times, since we had not completed the entire installation after the first engine start test. This meant we had to disconnect battery power several times before the entire build was completed. This required the ECU to shuffle through this idle learn procedure each time. But each time the engine quickly achieved a solid, smooth idle.


Eric also added a cool little device that he found online called an OBD Link+ that plugs into the Painless OBD-II port and wirelessly links the ECU to your smart phone. Eric set this up and used a separate software package to configure his smart phone with a custom dash, displaying any number of different items like vehicle speed, engine rpm, engine coolant temperature, system voltage, and even fuel usage displayed in gallons per hour.
Once the system was up and running we took the Chevelle to Westech Performance where Eric Rhee spent about an hour or so tuning the final package. The part throttle fuel was right on the money and only required a slight tweak of the wide open throttle fuel. As a near-stock 5.7L LS with factory cathedral port heads and a small 219 at 0.050 camshaft, the LS still managed 325 rear-wheel horsepower, which indicated that the engine was making right around 425 flywheel horsepower.
Eric has now logged several thousand miles on the conversion with no significant issues. The entire drivetrain package is very close to factory and promises to easily deliver fun-filled cruising for perhaps another 100,000 miles. There’s something to be said for late model performance and reliability.


Parts List
Painless harness Gen III LS, add length, mech. TB 60219 Summit
Painless “411” ECU w/ PassKey eliminated 60711 Summit
Seals-It firewall grommet GS-100320 Summit
Speedhut Speedbox for speedometer A-304 Summit
Dakota Digital Tach / Speedometer Interface SGI-100BT Summit
Painless alternator pigtail 30705 Summit
Painless four pin brake light switch 80176 Summit
OBD Link+, OBD Solutions data like Amazon Amazon
RockAuto twin fan assembly Four Seasons 75282 RockAuto
Sources
Dakota Digital
(605) 332-6513 ● dakotadigital.com
Painless Performance
(817) 560-8324 ● painlessperformance.com
Speedhut
801/221-1400 ● speedhut.com
RockAuto
(866) 762-5288 ● rockauto.com
Westech Performance Group
(951) 685-4767 ● westechperformance.com
The post Wiring A Factory ECU Into Your LS-Swapped Muscle Car Can Truly Be Painless appeared first on The Online Automotive Marketplace.


